How to configure eTube connector?
To configure eTube connector, follow the steps below:
Step 1: Copy "eTube" folder in “C:\Program Files\Empress Media”
Step 2: Make sure that CGI service is enabled in IIS.
Please refer the below link :
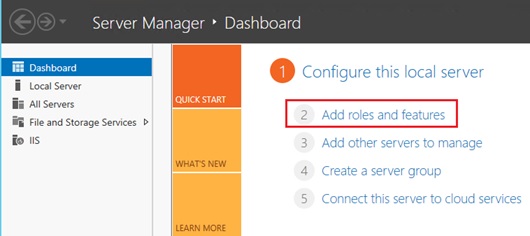
Step 3: Open Server Manager> Dashboard and click on Add Roles and Features Wizard.
Step 4: Click Next.

Step 5: Select Role-based or Feature-based installation radial icon.

Step 6: Now click on Select a server from the server pool radial icon.
Step 7: Locate web server (IIS) option and expand it. Again expand web server from the list appeared.
Step 8: Select ISAPI extensions and click Next and install it.
Step 9: Once it is completed, go to https://www.python.org/downloads/ and download the latest version of Python.
Step 10: Run the Python setup and make sure to set the installation path as C:\Python37. Python37 denotes python 3.7, you can change the folder name according to python version.
But ensure, the folder is first child of C:\ drive, not inside any other folder.
Step 11: Now install wfastcgi. Open command prompt and execute pip install wfastcgi
Step 12: After installing wfastcgi, again open Command Prompt with “Run as Administrator” and enable fastcgi.
Step 13: Go to C:\Python37\lib\site-packages folder and copy wfastcgi.py file.
Step 14: Paste wfastcgi.py to "C:\Program Files\Empress Media\eTube" folder.
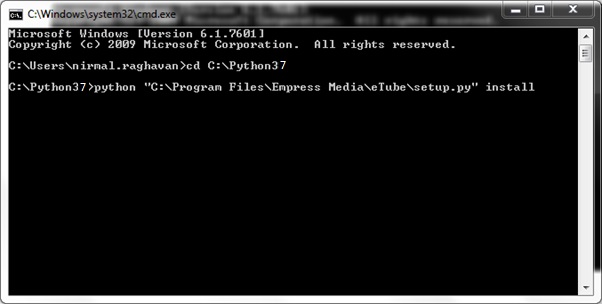
Step 15: Open CMD and enter “cd C:\python37”.
Step 16: Enter “python “C:\Program Files\Empress Media\eTube\setup.py” install”.
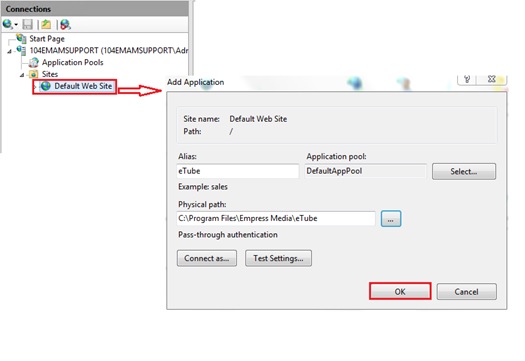
Step 17:
Create a new application, "eTube" in IIS pointing to "C:\Program
Files\Empress Media\eTube" directory. Assign administrator privilege to
the application.
Step 18: Select eTube and go to "Handler Mapping" in IIS.
Step 19: Select "Add Module Mapping" and assign the following values.
Request path: *
Module: FastCgiModule
Executable: C:\Python37\python.exe|"C:\Program Files\Empress Media\eTube\wfastcgi.py"
Name: eTubeHandler
Step 20: Click "Request Restrictions". Make sure "Invoke handler only if request is mapped to:" checkbox is unchecked.
Step 21: Select OK. If a warning popup, click "Yes".
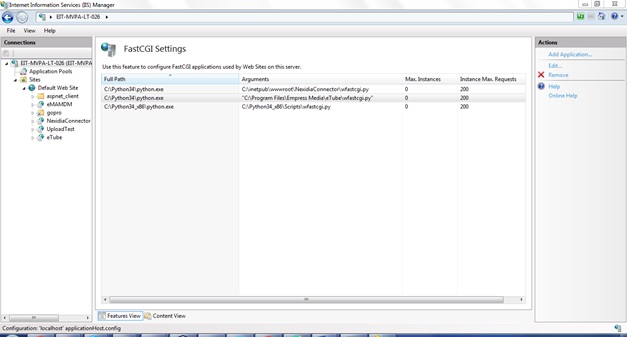
Step 22: Go to the root server settings and click "FastCGI Settings".
Step 23: Double click on the "C:\Python37\python.exe", where the argument is "C:\Program Files\Empress Media\eTube\wfastcgi.py"
Step: 24: Goto Application pools in IIS and associate Administrator account with default application pool
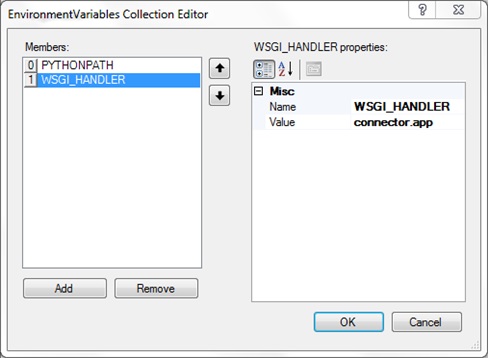
Step 25:
Under "FastCGI Properties" -> "General" select Environment
Variables. A "..." button will appear now, click that button. Add the
following variables.
1:PYTHONPATH
2:Value : C:\Program Files\Empress Media\eTube\
1:Name : WSGI_HANDLER
2:Value : connector.app
Step 26: Go to eMAM Super Admin (http://localhost/eMAMSuperAdmin) and create the desired workflow.
1.Set Action Type as Notify.
2.Put the following string as body.
{"file": "%e_FILE_FullHighResVirtualPath%",
"title": "%e_FILE_Title%",
"description": "%e_FILE_Description%",
"category_id": "22",
"privacy_status": "public"
}
3 Select URI and enter the eTube URL, http://localhost/eTube/upload_video (Replace localhost with server address).
Save the workflow.
Step 27: Go to https://console.developers.google.com/ Login with xxxxxxxx@gmail.com account. Select Credentials.
Step 28: Select etube
Step 30: Now go to C:\Program Files\Empress Media\eTube and edit connector.py. Edit the Redirect URL and replace the localhost with the public Server IP or domain name
Step 30: Downloaded Client secret file from Google developer page and placed inside eTube folder
Step 31: Go to http://localhost/eTube/connect (replace localhost with iPaddress )
This will redirect user to Google OAuth page. Provide
Google account credential and Allow eMAM to access your YouTube channel.
For any further assistance, please get in touch with eMAM support at support@emamonline.com.
Related Articles
eMAM post-implementation configurations
1. Adding MIME type for epr, rtin etc Go to IIS > #1. Click on Default Gateway (This way virtual directory that comes under it will inherit MIME types added to it). #2. Click on MIME types #3. Click on Add. #4. Enter File name extension (.epr, .dmg, ...How to install S3 Connector components to an existing eMAM system?
You cannot add an S3 Connector component (any component) by running the eMAM setup application again. Please follow the steps below to add an S3 connector without impacting the existing configuration. 1. Install the eMAM setup application on a new ...What is an eMAM S3 connector ? What does it do?
eMAM S3 Connector is nothing but cloud connector A cloud connector lets users view, operate and transfer their computing resources between private cloud environment and public clouds. eMAM has purchased storage space in Amazon cloud to store the low ...How do I configure Wasabi as an Archive and Storage destination in eMAM?
Wasabi is a simple, fast, secure, enterprise class, tier-free, instantly available cloud storage solution that allows you to affordably store an infinite amount of data. eMAM partners with Wasabi to offer its customers a high-performance media ...How to configure Harmonic WFS delivery profile in eMAM?
1. Login to WFS Manager. 2. Click on Tools -> Workflow Editor. 3. Click on Workflow Templates. 4. Enter a name for the workflow and click on 'Create' button. 5. Right click on 'Transcode Targets' and click on 'Add Target'. 6. Now click on the ...