How to integrate Vantage with eMAM?
Vantage users can create their own workflow & use that in eMAM. Vantage is already integrated with QC & other delivery vendors hence users can configure them in their workflows and can easily use it in eMAM.
Follow the below steps to integrate a Vantage workflow with eMAM.
1. eMAM Workflow Management
After installing Vantage, import the workflows needed for eMAM transcode manager as well as the eMAM Delivery manager.
To import workflows to Vantage, open the Vantage application and browse the XML file for the workflow after
selecting File → Import Workflows. (Do this for both the workflows ie, eMAM Delivery Workflow and eMAM Ingest Workflow)
Now, obtain the IDs of the workflows. To get workflow ID details, right-click on a workflow - click on Details Panel. A pop-up window will open up with all details of that workflow including ID.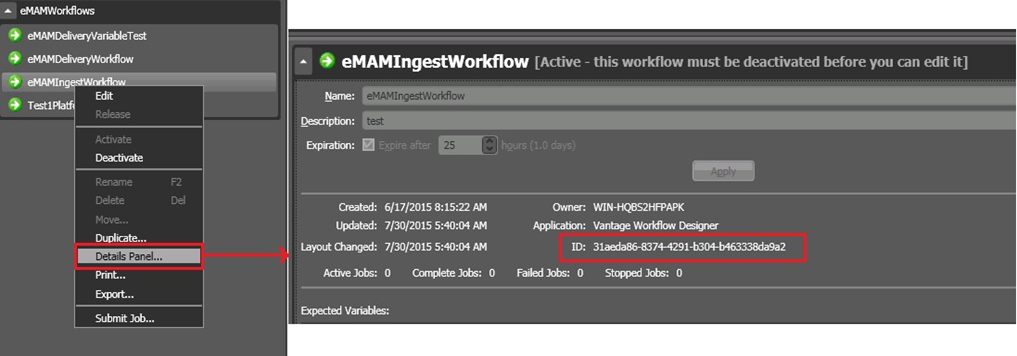
After the workflow is successfully imported, activate it by clicking on the ‘Activate’.
Now add entries for the network paths that will be used in the workflows. This can be done from the Vantage management console. Select Settings & Options then select the Authorization tab
Credentials can also be tested
After adding credentials, ensure that it is correct by clicking on the Test button.
2. Creating new workflows.
Users can create their own workflows with the Vantage workflow designer for Ingest & Delivery. The Workflow Design tab which is a design space can be used to create and update your workflows. As you design (or modify) a workflow, all of the changes you make to the workflow are automatically stored in the Vantage database. Once you've designed a workflow, you can activate it - by starting its monitor task. When a monitor identifies a new file, it starts a job, to process the file using the workflow monitoring the hot folder where the new file is located. You use the Job Status tab to view all of the running jobs for the currently selected workflow. You can view the task-by-task details of jobs, and watch them execute. Further, both the Monitor and Job-status tabs allow you to see a history of previous jobs and monitor sessions.
Ingest workflow
Users can design their own Ingest workflow in the Vantage interface & the workflow Id created can be used while creating Ingest profiles in the Super Admin console.
Delivery workflow
Similarly, users can also create Delivery workflows & workflow id created can be used while creating a Delivery Profile in the Super Admin console.
3. Configuring the Ingest Manager
1. Port 8676 should be opened between eMAM Ingest Manager server and Vantage server.
2. Open the following folder, C:\Program Files\Empress Media\eMAM Ingest Manager on the eMAM Application server.
<endpoint address="http://localhost:8676/Domain" binding="basicHttpBinding" bindingConfiguration="Domain" contract="VantageSdk.IDomain" name="Domain"/>
<endpoint address="http://localhost:8676/Catalog" binding="basicHttpBinding" bindingConfiguration="Catalog" contract="VantageSdk.ICatalog" name="Catalog"/>
<endpoint address="http://localhost:8676/Binder" binding="basicHttpBinding" bindingConfiguration="Binder" contract="VantageSdk.IBinder" name="Binder"/>
<endpoint address="http://localhost:8676/Folder" binding="basicHttpBinding" bindingConfiguration="Folder" contract="VantageSdk.IFolder" name="Folder"/>
<endpoint address="http://localhost:8676/Item" binding="basicHttpBinding" bindingConfiguration="Item" contract="VantageSdk.IItem" name="Item"/>
<endpoint address="http://localhost:8676/Workflow" binding="basicHttpBinding" bindingConfiguration="Workflow" contract="VantageSdk.IWorkflow" name="Workflow"/>
<endpoint address="http://localhost:8676/Submit" binding="basicHttpBinding" bindingConfiguration="Submit" contract="VantageSdk.IWorkflowSubmit" name="Submit"/>
<endpoint address="http://localhost:8676/Job" binding="basicHttpBinding" bindingConfiguration="Job" contract="VantageSdk.IWorkflowJob" name="Job"/>
<endpoint address="http://localhost:8676/Session" binding="basicHttpBinding" bindingConfiguration="Session" contract="VantageSdk.IJobSession" name="Session"/>
<endpoint address="http://localhost:8676/Content" binding="basicHttpBinding" bindingConfiguration="Content" contract="VantageSdk.IContent" name="Content"/>
<endpoint address="http://localhost:8676/File" binding="basicHttpBinding" bindingConfiguration="File" contract="VantageSdk.IFile" name="File"/>
<endpoint address="http://localhost:8676/Flip" binding="basicHttpBinding" bindingConfiguration="Flip" contract="VantageSdk.IActionFlip" name="Flip"/>
<endpoint address="http://localhost:8676/Service" binding="basicHttpBinding" bindingConfiguration="Service" contract="VantageSdk.IService" name="Service"/>
3. Open eMAMIngestManager.exe.config
4. Search for the below tags and replace localhost with IP/DNS of the Vantage server
<endpoint address="http://localhost:8676/Domain" binding="basicHttpBinding" bindingConfiguration="Domain" contract="VantageSdk.IDomain" name="Domain"/>
<endpoint address="http://localhost:8676/Catalog" binding="basicHttpBinding" bindingConfiguration="Catalog" contract="VantageSdk.ICatalog" name="Catalog"/>
<endpoint address="http://localhost:8676/Binder" binding="basicHttpBinding" bindingConfiguration="Binder" contract="VantageSdk.IBinder" name="Binder"/>
<endpoint address="http://localhost:8676/Folder" binding="basicHttpBinding" bindingConfiguration="Folder" contract="VantageSdk.IFolder" name="Folder"/>
<endpoint address="http://localhost:8676/Item" binding="basicHttpBinding" bindingConfiguration="Item" contract="VantageSdk.IItem" name="Item"/>
<endpoint address="http://localhost:8676/Workflow" binding="basicHttpBinding" bindingConfiguration="Workflow" contract="VantageSdk.IWorkflow" name="Workflow"/>
<endpoint address="http://localhost:8676/Submit" binding="basicHttpBinding" bindingConfiguration="Submit" contract="VantageSdk.IWorkflowSubmit" name="Submit"/>
<endpoint address="http://localhost:8676/Job" binding="basicHttpBinding" bindingConfiguration="Job" contract="VantageSdk.IWorkflowJob" name="Job"/>
<endpoint address="http://localhost:8676/Session" binding="basicHttpBinding" bindingConfiguration="Session" contract="VantageSdk.IJobSession" name="Session"/>
<endpoint address="http://localhost:8676/Content" binding="basicHttpBinding" bindingConfiguration="Content" contract="VantageSdk.IContent" name="Content"/>
<endpoint address="http://localhost:8676/File" binding="basicHttpBinding" bindingConfiguration="File" contract="VantageSdk.IFile" name="File"/>
<endpoint address="http://localhost:8676/Flip" binding="basicHttpBinding" bindingConfiguration="Flip" contract="VantageSdk.IActionFlip" name="Flip"/>
<endpoint address="http://localhost:8676/Service" binding="basicHttpBinding" bindingConfiguration="Service" contract="VantageSdk.IService" name="Service"/>
5. Search for tag <baseAddresses>, you can find a key like below.
<add baseAddress="http://localhost/eMAMVantageService/"/>
Replace localhost with the IP/DNS of the eMAM Ingest Manager server.
6. Restart eMAM Ingest Manager
7. Once these steps are done, please copy the base address (from eMAMIngestManager.exe.config) and paste it into a browser. You can see a page below.
4. Super Admin Configuration
Ingest profile configuration
Users can create a new Ingest profile in the Super Admin console using the Workflow ID created in the Vantage interface.
Manage Transcode Servers
- Transcode Server Name: Input the server name where Vantage is installed
- Transcode Server IP/Host Name: IP of the vantage server
- Transcoder Type: There is a drop-down list to select various Transcoder types. Select Telestream Vantage
- Webservice Url: http://localhost/eMAMVantageService (This is the base address of eMAM Vantage Service in Ingest Manager's config file. It will be used by Delivery Service for Vantage Delivery. Replace localhost with machine IP of the server in which ingest manager is running if needed)
Default Parameters
- Workflow ID: ID of the Vantage workflow to be used by the Ingest Manager.
Define Variables: Users can add custom variables in the workflow using  icon. System variables are reserved for eMAM services. Its values will be provided by eMAM so users cannot add or edit those variables.
- Variable Name- -Name of the Vantage Variable used in the workflow
- Type- The data type of the variable Int, string etc.
- Value- Value for the variable
- Control- It can be one of the following
- Super Admin- Only Super admin can modify the values of these variables. They won't be available for editing in Feeder.
- Unit Admin- Super Admin or Unit Admin can modify these variables. They will be available in Feeder for editing only if the logged-in user is a Unit Admin
- Unit User- Super admin/unit admin/ unit user can modify these variables. They will be available for editing in Feeder.
In eMAM Ingest profiles there are two variable options:
1. System variables - These are system-defined variables that a user cannot change the value. This has already defined the basic eMAM workflow.
2. User-defined variables - In addition to the basic workflow, the users can add their own actions to modify the workflow. Also, they can pass data from outside into the workflow e.g. Custom metadata values or other custom values. This can be achieved by defining variables in the workflow and in eMAM ingest profiles. Once these variables are defined in the ingest profile, the eMAM Ingest manager will submit the job with these variables to the vantage transcoder engine.
An ingest profile is created using the above transcode server the ingest manager service is restarted.
Delivery profile configuration
Users can create a new Vantage delivery profile in eMAM Super Admin Console using the Workflow ID created in the Vantage interface.
Manage Transcode Servers.
- Transcode Server Name- Name of the server where vantage is installed Transcoder
- Server IP/Host Name- IP of the server where vantage is installed
- Transcoder Type: For Vantage Transcoder Type, Define Default Parameters.
- WorkFlow ID- ID of the Vantage workflow to be used by Delivery Service
- Define Variables: Users can add custom variables in the workflow using
- Variable Name- Name of the Vantage Variable used in the workflow
- Type- Data type of the variable eg: Int, string, etc
- Value- Value for the variable
- Control- It can be one of the following
- System: System variables are reserved for eMAM services so users cannot add or edit those variables.
- Super Admin- Only Super admin can modify the values of these variables. They won't be available for editing in Delivery Widget.
- Unit Admin- Super Admin or Unit Admin can modify these variables. They will be available in the Delivery widget for editing only if the logged-in user is a Unit Admin
- Unit User- Super admin/unit admin/ unit user can modify these variables. They will be available for editing in the Delivery widget.
A delivery profile is created using the above transcode server the delivery service is restarted.
Passing variable values
Vantage users have the option to interchange variables/values from eMAM to Vantage. Users can define variables, add values & set up controls for different types of users in Super Admin. In order to pass a value to a variable created in eMAM, the user needs to create a variable with the same name (case sensitive) in the eMAM Ingest profile/eMAM Delivery profile.
Submitting ingest job using eMAM Feeder
While ingesting files using eMAM Feeder, when a user selects eMAM Transcoder Manager as transcoder and Vantage profile as ingest profile, the Custom variables button will become visible in the metadata window.
When a user clicks on the Custom Variables button, a new popup window will appear to modify the Vantage transcoder’s variables.
Submitting delivery jobs from the director
In Director Interface, assets dragged and dropped into the Delivery widget can be added to the Delivery Queue to send to the next station or user in the workflow, or for final sequencing and delivery to the client. Users can click Deliver from the widget’s pull-down menu to send assets to the Vantage delivery profile (already configured in Super Admin). A popup screen with a list of all delivery profiles will show up. Vantage delivery or Vantage transcoding delivery when selected will have the option to Edit variable values in another small pop-up window. Assets sent to Delivery Queue can be monitored in the Dashboard widget.
Related Articles
What all custom workflows can be created in eMAM?
Workflow automation is a set of actions (operations) performed on satisfying a set of conditions provided for an event. You can create different workflows to automate events and actions. Each workflow has 3 parts – Events, Conditions & Actions. Event ...What is eMAM?
eMAM™ is a media asset management platform that gives users powerful tools to find and use lightweight proxy or native resolution media from any number of local or cloud storage and archive systems. With scores of best-in-breed integrations, eMAM can ...Released eMAM Version 5.4 (April 2023)
EMAM, Inc. is excited to announce the release of eMAM version 5.4! This new release includes several key features and enhancements to help you manage your media assets more efficiently than ever before. In addition to the key features, eMAM version ...Release Notes eMAM Version 5 6
Introduction Welcome to the release of eMAM 5.6, the latest version of our industry-leading media asset management platform. This release introduces powerful new features, key enhancements, and integrations designed to optimize workflows, strengthen ...Release Notes eMAM version 5.5
EMAM, Inc. is excited to announce the release of eMAM version 5.5! This new release includes several key features and enhancements to help you manage your media assets more efficiently than ever before. In addition to the key features, eMAM version ...